Keep your children busy this holiday season with these fun and festive Christmas arts and crafts projects:
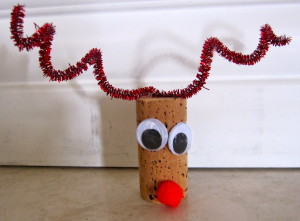
Rudolph, The Red Nosed Reindeer Wine Cork
- 1 wine cork (Mom can help with that! Kidding!)
- 1 Red pompom
- 1 Sparkly Red Pipe Cleaner
- 2 Goggly Eyes (I really like the peel and stick kind, because it’s easier and less messy.)
- Scissors (Try My First Safety Scissors, by Crayola (3 Piece Set))
- Glue
Instructions:
- Use scissors to cut the pipe cleaner in half to make antlers.
- Curl the pipe cleaner around your finger and then slide your finger out.
- Glue the pipe cleaner to the top of the cork.
- Glue the pompom to the cork. (Tip: If you’d like to use it to re-cork your wine bottle at your Christmas party, place the pompom a bit higher than shown.)
- Glue the two goggly eyes to the cork as shown.
- Incorporate Learning: Ask your child to identify the names of Rudolph’s body parts shown and to describe how their body parts are different than Rudolph’s. (ex. “Rudolph’s nose is red and mine is white.”)
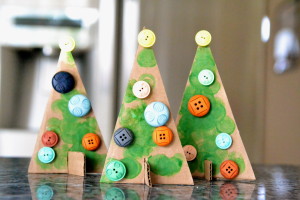
Christmas Tree w/ Stand Decoration
- Cardboard
- Scissors
- Green Do-A-Dot Marker
- Multicolored Buttons (These are super cute buttons.)
- Glue
Instructions:
- Use scissors to cut out a triangle out of cardboard as shown. (This will be the tree.)
- Cut a small slit in the middle bottom of the triangle.
- Cut out a small rectangle out of the extra cardboard as shown. (This will be the base.)
- Use a green Do-A-Dot marker to color the tree green.
- Glue a yellow button to the top of the tree. (This is the star.)
- Glue an assortment of different colored buttons onto the tree. (These are the ornaments.)
- Repeat #4 – #6 on the other side. (Tip: If you make several of these, they would make great centerpieces for your dinner table.)
- Carefully slip the base into the slit of the tree.
- Incorporate Learning: Ask your child to identify the shape of the tree and ornaments and to name the colors of the ornaments and star.
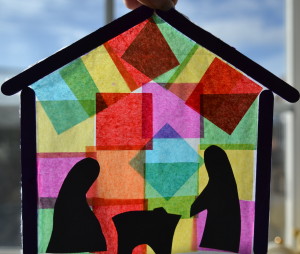
Nativity Silhouette Sun Catcher
Materials Needed:
- Wax Paper
- Multicolored Tissue Paper Squares
- Black Construction Paper
- 4 Black Popsicle Sticks
- Scissors
- Glue
- Pencil
Instructions:
- Glue four popsicle sticks onto the wax paper as shown to make the manger.
- Use scissors to trim the excess wax paper that goes beyond the popsicle sticks.
- Glue multicolored tissue paper squares onto the wax paper. (Tip: Start out by glueing squares next to the popsicle sticks perpendicularly as shown. Then do the middle.)
- Use a pencil to draw the shapes of Jesus, Mary, and Joseph on black construction paper.
- Use scissors to cut out the shapes of Jesus, Mary, and Joseph.
- Glue Jesus, Mary, and Joseph to the nativity scene as shown.
- Incorporate Learning: Ask your child to count how many people are in the nativity, identify the shape of the tissue paper, and identify the colors of the tissue paper.
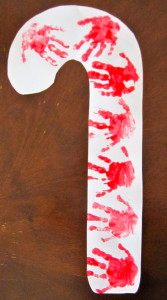
Giant Candy Cane Wall Decoration
Materials:
- Large piece of white construction paper
- Red Washable Paint
- Paintbrush
- Paper Plate
- Scissors
- Pencil
- Ruler
Instructions:
- Use a ruler to help you draw a giant candy cane with a pencil on a large piece of white construction paper. (Tip: You can also tape two pieces of regular sized construction paper together to create a giant piece.)
- Cut out the candy cane.
- Squirt some red paint onto a paper plate.
- Dip the paintbrush into the red paint and then paint your child’s hand with the paintbrush.
- Carefully help your child make handprints on the candy cane by firmly and evenly pressing their hand down on the candy cane until the entire candy cane is covered with handprints as shown. (Note: Repeat #4 if necessary when doing #5)
- Incorporate Learning: Ask your child to count how many handprints fit on the candy cane.
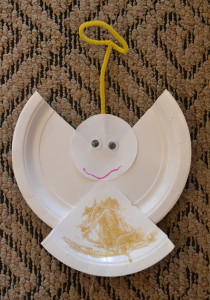
Angel Paper Plate Decoration
Materials:
- White Paper Plate
- White Construction Paper
- 1 Yellow Pipe Cleaner
- 2 Googly Eyes
- Gold Glitter Glue
- Circle Stencil
- Pencil
- Scissors
- Glue
- Red or Pink Marker
Instructions:
- Use scissors to cut out a piece about 1/3 the size of the paper plate as shown.
- Glue the piece to the bottom of the paper plate as shown. (This is the gown.)
- Use a circle stencil and a pencil to trace a circle on the white construction paper. (Tip: The rim of a paper cup works great as a circle stencil.)
- Glue the circle to the paper plate as shown. (This is the face.)
- Glue two goggly eyes to the face as shown.
- Use a red or pink marker to draw a smile on the face.
- Manipulate one end of the pipe cleaner to make a circle and twist the end of it to make it stay put.
- Glue the other end of the pipe cleaner to the back of the face.
- Use gold glitter glue to decorate the angel’s gown.
- Incorporate Learning: Ask your child to identify the parts of the angel’s body that they do not have. (Ex. “The angel has wings and a halo and I do not.”)
To learn how to make a Star Ring Chain Countdown to Christmas craft, please click here.
For Christmas Activities for kids, please click here.


